Monday, June 30, 2008

Keeping Cool in the Summer

I am not and probably never will be a chronological scrapper. I enjoy picking and choosing, both from my kits and from my photos as to what to scrap and when to scrap it. If you view my scrap gallery, you can easily see the progression from somewhat recent to heritage to 10 years ago to recent and back again! My albums follow this same progression so while on one page you may view my daughter at 14, on the next, she may still be a toddler!

Is it any wonder then that today I was scrapbooking some pictures, which I recently scanned in from my old SLR camera, and though outside it was hovering around 29 degrees Celsius, inside I was thinking cool thoughts as I scrapped images from Winter 2001! It is amazing what the power of thought can do . . . think cool, be cool!

Anyway, this is the layout I came up with today:

Snow
Click layout for larger image and full credits.

How about everybody else . . . do you scrap chronologically or haphazardly like me? Leave me a comment below!

Friday, June 27, 2008

Troubleshooting Layer Blend Modes

Seldom do I create a layout where I don’t change at least one layer’s blend mode to something other than normal. In the two-page layout, Dog Days of Summer, I have used Hard Light to blend the photos of the dogs into the background paper. I have used the Color blend mode when using a Hue/Saturation adjustment layer to subtly re-color the cardboard overlays, cardboard flourishes, and alpha. When it came to creating the “summer” portion of the title, I also made use of a layer blend mode, Luminosity, to create the desired effect.

dog_days_2page_web
Click layout for larger version and full credits.

The original alpha is Scratched Up 2 by Micheline Martin.

Scratched Up 2 by Micheline Martin

I wanted to maintain my monochromatic color scheme (yes, this is monochromatic – GREEN – except for the addition of two neutral colors – brown and white!) in the layout so I had experimented with the layer blend modes to get this green version of the alpha. However, on closer look (and you should ALWAYS do this!) I found that the Luminosity mode that I was using caused problems with the alpha because the alpha was not lying wholly on the background; instead, the alpha overlapped a photo which had a white border. What to do? To solve this problem, I ended up copying and pasting pieces of the background to put beneath each alpha layer in the layout. This way, the alpha maintained the desired effect without the problem of the blend mode being effected by overlapping the alpha on the photo. The photos below illustrate the technique I used to troubleshoot my way around the problem created by using the Luminosity blend mode.

ddimage10


ddimage16
Screen cap shows problem with blend mode when alpha overlaps white border on photo.

ddimage2
Screen cap shows problem with blend mode where alpha overlaps a cardboard flourish.

Steps to solve the problem! To more easily illustrate this tutorial, I have adjusted the Palette Options on the Layers Palette by clicking the right facing arrow at the top of the Layers Palette and choosing Palette Options from the menu.

ddimage14

ddimage13

First, select the background paper layer.

ddimage5

Remain on the background layer but hold Control and click on the thumbnail of the S alpha layer to select the S.

ddimage6

ddimage17

Use the shortcut Control+J to duplicate the selection to a new layer above the background layer.

ddimage7

Drag the new layer up the Layers Palette until it is directly under the S alpha layer. Select both layers and link them so that they stay together.

ddimage11

Because the green background layer is now directly behind the letter, no other pieces of the layout show through the letter due to the choice of the Luminosity blend mode.

ddimage9

Repeat this procedure with all the other letters.

ddimage12

Now it looks much better!

ddimage15

I hope you have enjoyed this tutorial! This method will work for both Photoshop and Photoshop Elements though I am not certain if the shortcut Control+J still works in Photoshop Elements 6. If it doesn’t, you may use the shortcuts Control+C to copy the selection and Control+V to paste it onto a new layer.

Let me know how you have used this strategy or ask me a question about it by leaving me a comment below! Be sure to sign up for email notifications of blog posts by entering your email in the spot on the top right of my blog.

Monday, June 23, 2008

Polishing my Photographic Technique

This past weekend, I had the opportunity to participate in the first of its kind in Manitoba, Canada . . . MPAX 2008 . . . Manitoba Photographic Arts Expo 2008! It was held at The Forks in Winnipeg, Manitoba.

This expo was thought up by fellow Manitoba Camera Club member, Joe Kerr, and I was able to participate on the Program Committee for this event. In all, there were seven well respected Keynote presenters from Manitoba as well as fourteen hands-on Workshops led by other local photographers.

I was fortunate to take in two of the Keynote presentations. I saw Robert Taylor and his African Safari presentation as well as Light, Camera, Action by Dennis Fast. Robert Taylor is both a naturalist and photographer with over 40 years of experience. He has led over 20 African safaris. Dennis is a former teacher and his photographs have appeared in many calendars and books as well as in the award-winning best seller, Pelicans to Polar Bears.

The workshops covered a plethora of topics – bird photography, animal photography, child portraiture, color management, sunset and night photography, fireworks, floral photography, sports photography, panoramas and more! I was able to attend the sunset and night photography, panoramas, and also sports photography. For the sports photography workshop, led by Rob Bye, we were able to go out and shoot skateboarders in the fabulous skate park at The Forks. I had never even seen this structure nor had done any photography in this realm so I was pleased to be able to experience this thrill!

I took some time just to watch the various skateboarders to learn how they worked through their routines and then started taking some pictures. It was very hard to predict exactly where a skateboarder would be at any given time. Just when I thought I knew what place they would jump, they would change up their performance! However, I did manage to get quite a few shots but one in particular stood out for me.

Skateboarder

I was pleased with the exposure on this as well as the general composition. However, two things would have improved this shot:

  1. having more room in front of the skateboarder into which he could move
  2. having the skateboarder be facing the camera instead of away from it

What did I learn about shooting skateboarders?

  1. Not to expect a great shot without taking LOTS of photos!
  2. Practice, practice, practice!

I also tried the same photo with two different Lightroom presets applied.

Memories - Sandy Beach preset

Memories – Sandy Beach preset

Inside Lightroom - COL Deviant 2 preset

Inside Lightroom – COL Deviant 2 preset

Which version do you like the best? My choice would either be the original or the one using the Deviant 2 preset . . . I think it gives a little bit of edginess to the photo.

Have you tried a different type of photography lately? What would you like to try? Leave me a comment below!

Tuesday, June 17, 2008

Halloween in June!

The other day, I rounded up a number of photo events that need scrapping. Among them were four years of Halloween photos! It sure is fun to look back at these photos to see the excited gleam in my daughter's eye as she gets ready to go out trick-or-treating! My daughter always had some of the neatest ideas for costumes and this one is definitely an original!

This is the layout I created for Halloween 2005:

The Human Lipstick
Click image for detailed view and full credits.

What events have you neglected to scrap? I challenge you to sort through some of your un-scrapped photos and pick an event to scrap. Leave me a comment to let me know what you chose and if you would like, send me a link so I can post your result here!

Saturday, June 14, 2008

A Little Bit of Hybrid, A Little Bit of Digital

I promised to show you the acrylic scrapbook page I made while attending the crop in Steinbach. Last night, I was trying to get a picture of the thing hanging on the wall but all I got were reflections! This morning, I tried again, this time laying the page on a purple pillow near a window. I placed the layout on the pillow to supply some color for the background but the real color it should be on is teal because that's the color of our walls.

Acrylic Layout Wall Hanging

Of course, by taking the picture of this layout the way I did, you can't SEE that the thing is made of acrylic!

Anyway, the acrylic piece came cut in the 12 x 12 inch size and it had a peel off sheet of plastic on either side so that you could work on the layout without scratching or marking the other side. To help me with my design, I drew a little sketch. I knew that I wanted to position the photo where it was and I wanted also to have a border drawn around the layout to the bounds of the photo.

I glued on the photo, leaving a small opening where I wanted one of the flowers to tuck underneath. The border was drawn freehand. The flowers were hand cut from a flowered paper. Talk about FRUSTRATION! It is so much easier to "cut" shapes in digital scrapbooking!

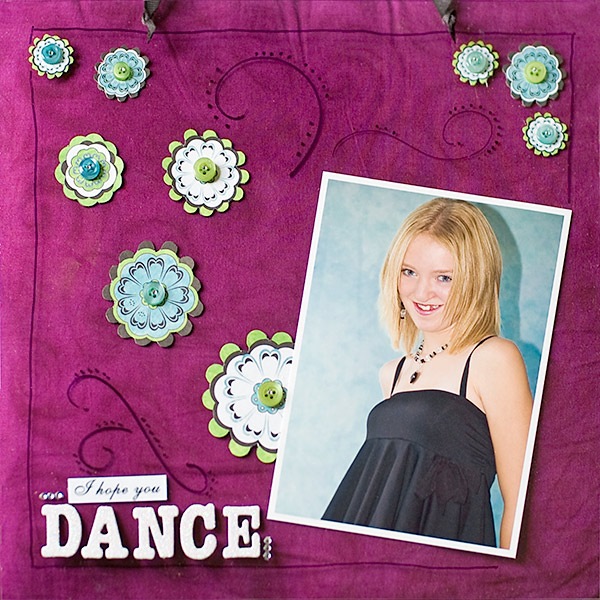
Once all my flowers were cut, I laid them out on the page till I found a design I liked. They were then glued in place. Each flower was topped with a button and then a small "jewel." Next, I added the flourishes by using a swirl template. I placed the letters for DANCE and added the three little "jewels" beside the word. When I got back home, I used the computer to print out the words, "I hope you" and printed them. After cutting them to size, I glued them to the page as well.

The black bits you can see at the top of the page are where I punched two holes and fastened a ribbon so I could hang it on the wall.

In all, I am pleased with what I created though it would have been SO much easier to create this on the computer! For those of you thinking that my daughter is into dance, the quote actually comes from the song by Lee Ann Womack, and refers to the act of living life to the fullest.

I Hope You Dance

I hope you never lose your sense of wonder,
You get your fill to eat but always keep that hunger,
May you never take one single breath for granted,
God forbid love ever leave you empty handed,

I hope you still feel small when you stand beside the ocean,
Whenever one door closes I hope one more opens,
Promise me that you'll give faith a fighting chance,
And when you get the choice to sit it out or dance.

I hope you dance....I hope you dance.

I hope you never fear those mountains in the distance,
Never settle for the path of least resistance
Livin' might mean takin' chances but they're worth takin',
Lovin' might be a mistake but it's worth makin',

Don't let some hell bent heart leave you bitter,
When you come close to sellin' out reconsider,
Give the heavens above more than just a passing glance,
And when you get the choice to sit it out or dance.

I hope you dance....I hope you dance.

Time is a wheel in constant motion always rolling us along,
Tell me who wants to look back on their years and wonder
Where those years have gone.

I hope you still feel small when you stand beside the ocean,
Whenever one door closes I hope one more opens,
Promise me that you'll give faith a fighting chance,
And when you get the choice to sit it out or dance.

Dance....I hope you dance.

I hope you dance....I hope you dance.
I hope you dance....I hope you dance..

Time is a wheel in constant motion always rolling us along
Tell me who wants to look back on their years and wonder where those years have gone

For those of you looking to create transparent pages digitally, Karen Karooch of Scraps of Mind has a unique technique for you!

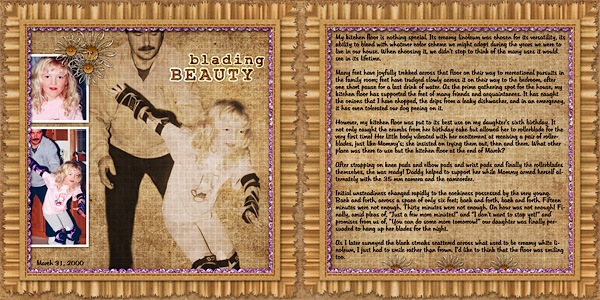
In the meantime, I have stuck to digital scrapbooking. Though the month is June, we haven't had a lot of great weather yet. Between the days of rain, I was able to snap some photos of our lovely lilac. To me, nothing says, "Spring" like a bunch of lilac!

Lilac
Click image for detailed view and full credits.

(And yes, our lilac REALLY is this dark purple color!)

Monday, June 9, 2008

The Best Use for my Kitchen Floor

Well, I started a layout at the scrapbooking crop I went to in Steinbach, but it just wasn't working out so I let it be so I could rework it in my mind and come back to it. I finally finished it. The layout itself has LOTS of journaling, that demanded its own page due to the length of it. I had a lot of trouble deciding on a color for the background when I tried to do the blending in of the main photo. Finally, it all came together when I went neutral, making use of my Page Ruffles, Volumes 1 and 2 to frame the pages. Special thanks to my friend, Charlene from Birds Hill, who suggested which photo would be best for the blended background - that made all the difference!

Blading Beauty
Click image for enlarged view and complete credits.

Journaling reads:

My kitchen floor is nothing special. Its creamy linoleum was chosen for its versatility, its ability to blend with whatever color scheme we might adopt during the years we were to live in our house. When choosing it, we didn’t stop to think of the many uses it would see in its lifetime.


Many feet have joyfully trekked across that floor on their way to recreational pursuits in the family room; feet have trudged slowly across it on their way to the bedroom, after one short pause for a last drink of water. As the prime gathering spot for the house, my kitchen floor has supported the feet of many friends and acquaintances. It has caught the onions that I have chopped, the drips from a leaky dishwasher, and in an emergency, it has even tolerated our dog peeing on it.


However, my kitchen floor was put to its best use on my daughter’s sixth birthday. It not only caught the crumbs from her birthday cake but allowed her to rollerblade for the very first time! Her little body vibrated with her excitement at receiving a pair of rollerblades, just like Mommy’s; she insisted on trying them out, then and there. What other place at the end of March was there to use but the kitchen floor?


After strapping on knee pads and elbow pads and wrist pads and finally the rollerblades themselves, she was ready! Daddy helped to support her while Mommy armed herself alternately with the 35 mm camera and the camcorder.


Initial unsteadiness changed rapidly to the cockiness possessed by the very young. Back and forth, across a space of only six feet; back and forth, back and forth. Fifteen minutes were not enough. Thirty minutes were not enough. An hour was not enough! Finally, amid pleas of, “Just a few more minutes!” and “I don’t want to stop yet!” and promises from us of, “You can do some more tomorrow!” our daughter was finally persuaded to hang up her blades for the night.


As I later surveyed the black streaks scattered across what used to be creamy white linoleum, I just had to smile rather than frown. I’d like to think that the floor was smiling too.

Tuesday, June 3, 2008

18 Hours of Scrapping Bliss!

I had the pleasure of attending another scrapbooking crop this past weekend. It took place in Steinbach, Manitoba, and was hosted by Scrapbook Cottage owner, Sharon. The crop took place at the Legion and Sharon brought her entire store there for the two days! The crop took place on Friday 4:00 - 10:00 pm and again on Saturday, 9:00 am to 9:00 pm. Sharon has a lovely store in Steinbach and is very friendly, helpful and enthusiastic about scrapbooking and creative paper crafts! If you are in the area, be sure to visit her.

Of course, I was the only one using a computer there, but I did meet Kim Newberg Villeneuve who creates Altered Art such as Artist Trading Cards (ATCs) and Altered Books and other art work using found objects. Be sure to check out her blog as well as her Etsy store. I purchased two of her pieces:

school house

I didn't get as much scrapped as I hoped to but I did complete a two-page layout about the Medieval Feast at my daughter's school.

medieval_2page_censored_web

Click photo to view full credits and larger size.

I also participated in a class where we created a 12 x 12 acrylic page. I don't have a picture yet of what I made but I will post it when I do.

Tag, You're It!

Well, I take the weekend off to go scrapping in Steinbach, Manitoba and come back to find I have been tagged by Diana!

Rules:
1.) Link your tagger and list these rules on your blog.
2.) Share 7 facts about yourself on your blog, some random, some weird.
3.) Tag 7 people at the end of your post by leaving their names as well as links to their blogs.
4.) Let them know they have been tagged by leaving a comment on their blog.

  1. I LOVE to read! If I don't have a book or magazine or something with me to read, I will read cereal boxes, etc. just so I can read SOMETHING! And, I will read the French side as well!
  2. I used to play the accordion (which I hate now!) and I can play almost anything by ear even though I can read music.
  3. Coffee is my addiction!
  4. I am the youngest of four kids in our family by a margin of 9 years.
  5. I would love to travel to the eastern Canadian provinces, down to the southern U.S., and to Europe.
  6. My husband and I have been following a 10 week running program where you both walk and run. We are up to 5.6 km, three times per week.
  7. I watch one soap opera - The Young and the Restless.

Here are the people I have tagged:

Miki Ferkul
Jen Ulasiewicz
Hummie
Karen Karooch
Kate Hadfield